Food Challenge Recipe 38: Frico Grilled Cheese Sandwiches

In the UK we have toasted cheese sandwiches, traditionally made in a sandwich press contraption, that’s usually so hard to clean after use that it’s makes more sense to buy a new one each time that try and get it clean. In the US they have no such problem – they make grilled cheese sandwiches and they are made in a skillet or frying pan. Simple, quick and much easier to clean up. I started making my grilled cheese sandwiches this way a few years back and it’s the only way I’ll do it now. They’re called ‘grilled’ cheese because in America when you ‘grill’ the heat comes from below, as opposed to in the UK where when we grill something the heat comes from above. (Think BBQ grill and you’ll get the idea)

Now, I know what you’re thinking – grilled cheese – that’s not a new recipe. But bare with me. I spotted this recipe over on smittenkitchen (yes her again!) and thought to myself “the only thing you can do to make a grilled cheese better is…. MORE CHEESE”.

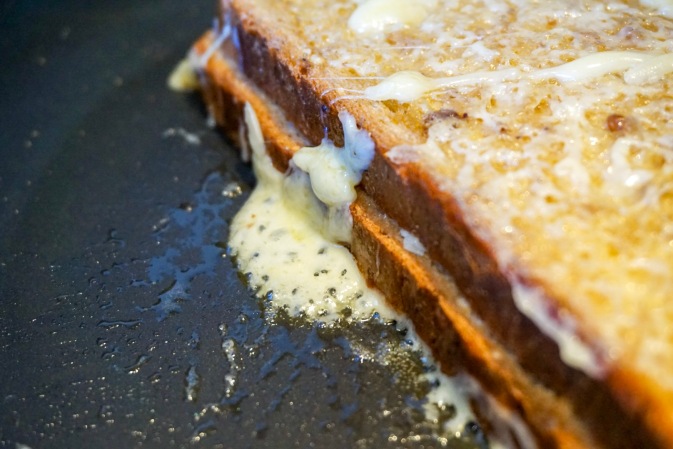
The thing that makes this grilled cheese BETTER is the addition of a small amount of cheese in the pan before the sandwich goes in. This creates a crust of that crispy, cheese, lacy melted cheese on the outside of each side of the sandwich. This thin lacy, crispy layer of melted cheese is also known as Frico.

So, to make this epic grilled cheese you start of with some decent bread. Thick but not too thick. I ALWAYS make my grilled cheese with sweet chilli sauce inside. I love how the sauce mingles with the mature cheddar flavour. It adds beautiful sweetness and slight heat, which cuts through the cheese.

LRG_DSC01812

I put about that much on the bread and spread it out evenly.

LRG_DSC01813

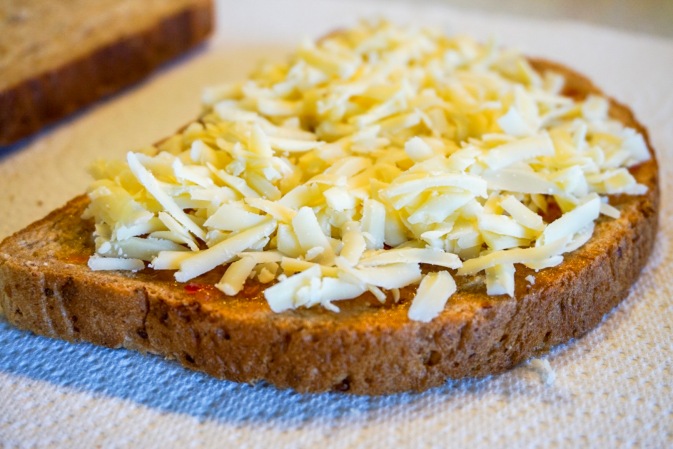
Then as much grated cheese as you want, but bare in mind this has to melt evenly. This is why grated cheese is more effective as the surface area of the cheese bits are smaller. I used lactose free mature cheddar.

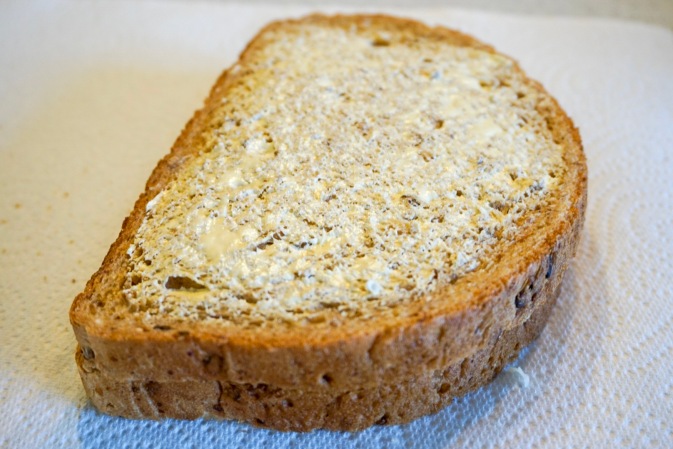
Then top this with the other slice. At this point, I use a spoon to spread a fairly thick layer of butter (I use Vitalite) on the outside of the top slice. I say to use a spoon to do this – I’ll explain why in a minute.

LRG_DSC01814

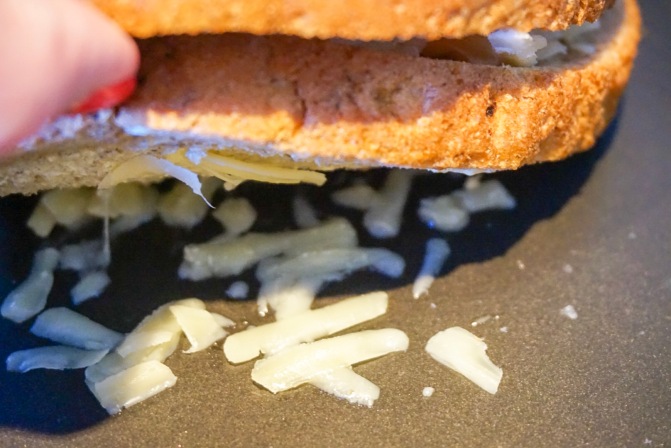
The next step is the warm the pan on a low-medium heat. Now the Smitten Kitchen recipe says you use 1 tbsp of grated cheese next, but I didn’t think this was enough so I used 2 tbsp (I was right).

You sprinkle the cheese into the pan, right where the sandwich is going to go, and the place the sandwich, butter-side down on top of the grated cheese.

LRG_DSC01815

Now remember I told you to use a spoon the spread the butter earlier? Here’s why. You now have a sandwich slowly grilling in the pan, but the side that’s facing up has no butter on it. I don’t like to butter both sides when prepping because you’re left with a buttery sandwich you can’t put down anywhere. Once it’s in the pan, you need to butter the side that’s now face up. But if you use a knife in a frying pan, it’s hard to get the angle you need to spread it. Enter: THE SPOON! It’s perfect for spreading at an angle and you’re not going to accidentally touch the hot pan. You heard it here first.

LRG_DSC01816

You’ve got to let the sandwich fry in the pan until it’s golden underneath and the cheese browns and fricos. This is about 4 minutes. Then you lift the sandwich up and out of the pan with a spatula, sprinkle 2 more tbsp of grated cheese on the pan and flip the sandwich over on top.

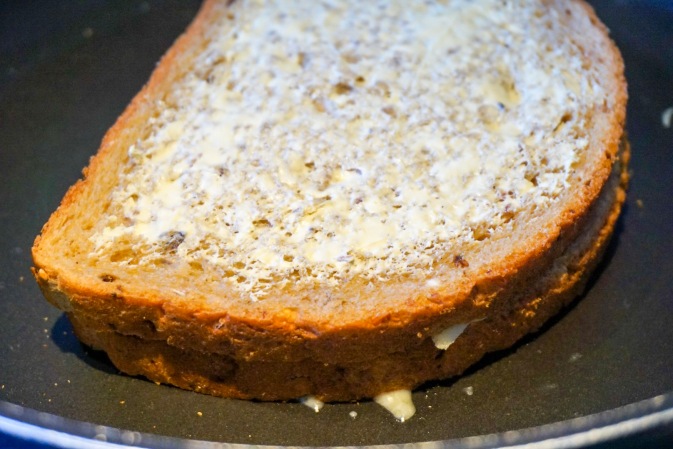
Cook this until that side is brown and crispy, pressing down with the spatula to encourage all the cheese inside to melt together.

LRG_DSC01817

And you’re done!

I always cut mine in half because it’s HOT in there.

LRG_DSC01823

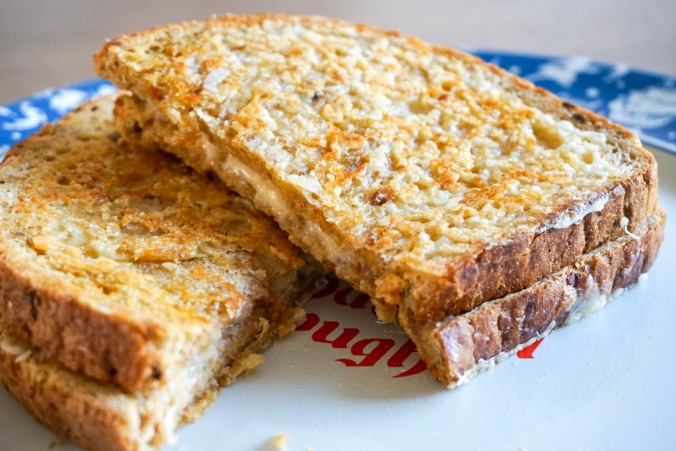
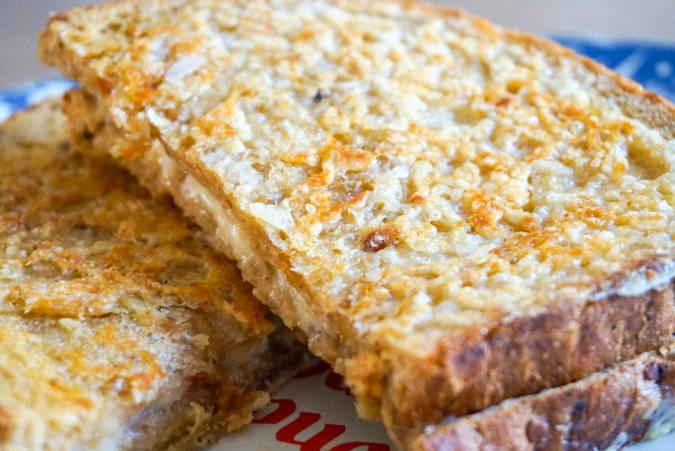
As you can see, the outside is crisp and the cheese has created a wonderful Frico crust.

LRG_DSC01818

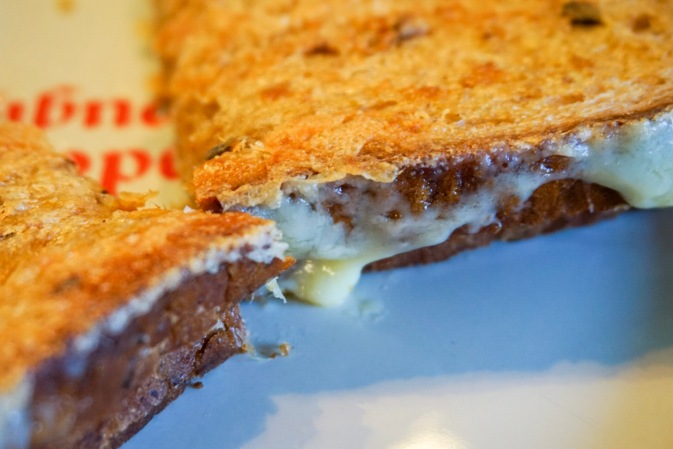
The inside is still melty, but the outside is that wonderful strong and crisp cheese flavour.

LRG_DSC01824

I won’t mince my words when I say, this was the best grilled sandwich I’ve ever eaten.

I give this recipe 10/10!


Food Challenge Recipe 37: Pecan Pie Muffins

As you will know, I’m currently on holiday in Orlando so I thought that the recipes I post whilst I’m there should be reflective of the kind of food I love to eat when I’m there.

This recipe for pecan pie muffins is so quick and simple, and uses very few ingredients. The method is a little unorthodox for me, but I went with it and the result was just fine!

This made 20 mini muffins. I’ll mention here, that the size difference between a muffin in the UK and a muffin in the US is different, so I just went with it and made the amount that the batter gave me. The recipe states it’s 8 muffins. I made 20 mini muffins. I suspect mine were mini cupcake size.

I set the oven to 160c (fan) and buttered a silicone tray in preparation for the batter. Then I chopped the pecans.

LRG_DSC01797

In a medium bowl I mixed the dry ingredients together: 1 cup of packed (pressed down) light brown sugar, 1/2 cup of plain flour, and 2 cups of chopped pecans.

LRG_DSC01799

Now, with cake batters, I’m used to creaming the butter and sugar together to start with and then adding the rest of the dry ingredients. Then when you add the eggs, there’s no curdling and everything is smooth. The next step in this recipe was to ‘beat’ 2/3 cup of softened butter and 2 beaten eggs, together.

I honestly don’t know how to do this. Everything’s too wet and slippery to ‘beat’ together. I ended up with this:

LRG_DSC01800

At which point I gave up and gradually added the dry ingredients into the wet, beating fast to try to prevent curdling.

LRG_DSC01801

If you look closely, you can see this still curdled a bit. But usually this will right itself in the oven anyway, so I just carried on.

I spooned the batter into the cups. The recipe stated to fill each cup 2/3 full. I clearly ignored this and just put a load in each one…

LRG_DSC01802

This then went into the oven for 15 minutes, until a toothpick came out clean when inserted into the middle of the muffins.

LRG_DSC01804

I left these to cool a little for a few minutes, before popping them out of the tray (I love these silicone trays!) and left them to cool entirely.

LRG_DSC01811

LRG_DSC01807

Once cooled it was time to try them!

Because these were called ‘Pecan Pie’ muffins, I expected them to be a bit sweeter, which is the main reason I made them as mini muffins instead of standard size. But they were really very tasty despite this.

LRG_DSC01827

The cake was a little dense, but still light. The denseness probably due to the method of making the batter. The pecans offered a lovely crunch and additional sweetness to the muffin.

The verdict:

These were quick, easy and tasty! They might be a little better with some kind of maple glaze on top.

I give this recipe 6/10

Food Challenge Recipe 35: Chocolate Peanut Butter Rice Krispie Treats

For a good while the recipes I’ve been making have been savoury meals, and Gary really wanted something a little bit naughty and sweet. He chose these peanut butter rice crispy squares, which looked quite simple, and can also be made vegan depending on what type of chocolate you put on the top. I’m not a fan of peanut butter, so I knew these wouldn’t be my ideal snack, but marriage is all about compromise 😀

LRG_DSC01728

There are only 4 ingredients in this, and you might find you already have these in the cupboard, so who knows, you could be eating some of these this evening!

LRG_DSC01730

You start off by measuring the rice crispies in a bowl – you need 105g.

Then line a square baking tin (or rectangle since that’s all I had) with parchment paper.

Add some golden syrup (80ml) and peanut butter (83g) to a saucepan and heat them together, stirring all the time until it just starts to bubble a little.

LRG_DSC01729

Once it’s melted together, it’ll be smooth.

LRG_DSC01734

I then poured this over the rice crispies and mixed it up until each of the crispies have been coated.

LRG_DSC01736

This was then pressed into the tray and the tray popped into the fridge to set.

When this had set, I melted 300g of chocolate in the microwave. I heated it in 30 seconds increments, stirring in the middle, until it was all melted.

I then poured the lot over the top of the crispies, smoothed it out, and then returned it to the fridge to set.

LRG_DSC01737

Once this was set it was time to remove it from the tin, which was really easy by simply pulling the baking paper up and out. And then I sliced the lot into 20 squares.

LRG_DSC01739

LRG_DSC01741

The squares were light and chewy, and a little crumbly (mainly because I’d not pressed the crispies down enough!).

LRG_DSC01740

The verdict:

Personally these weren’t for me, but if you like peanut butter, I’m told these are delicious! They were so simple to make, I’m sure I’ll be making these again!

I give this recipe 9/10


Food Challenge Recipe 33: Tomato, Veggie Sausage & Bean Stew

The weather had turned slightly autumnal when I picked out this recipe, and though it’s a stew, it was pleasantly light and not at all stodgy, which is what I’d hoped. It’s not quite autumn yet!

What I liked about this recipe was that it used veggie sausages, a I used the Cauldron Lincolnshire ones, as recommended by the recipe.

LRG_DSC01715

This was a very fast and very filling dish. I made enough for 2 people.

You start off by frying 3 of the sausages (halved) and 1/2 a diced white onion in a little oil, for about 8 minutes.

LRG_DSC01716

Then you add 1/2 clove of garlic (diced), 1/2 tsp of smoked paprika and some chilli flakes and cook for one minute.

LRG_DSC01718

While these were cooking, I wedged 300g of salad tomatoes.

LRG_DSC01714

Once the spices are cooked out a little, you add a pinch of sugar and all the tomatoes to the pan.

LRG_DSC01719

These cook for 5 minutes, and you can see the tomatoes start to soften and break down slightly.

Add in 100ml of vegetable stock and a 400g can of cannellini beans that have been drained and rinsed.

LRG_DSC01720

Season and stir, then simmer for 5 minutes.

LRG_DSC01723

At this stage you’re meant to add in some freshly chopped parsley, but I hate the stuff, so a little ground pepper will do for me!

LRG_DSC01724

I served this into bowls, and we ate it with a spoon and fork.

LRG_DSC01726

Though the sausages still looked a little pale, they were cooked through and tasty.

The beans were soft and the broth was well-seasoned, warm with chilli spice and very delicious.

LRG_DSC01725

It did feel like there was a LOT of tomato in there, so you’ve really got to like tomatoes to eat this!

The verdict:

I did enjoy this. The flavour of the broth was lovely, though I wasn’t overly keen on the sausages as they had a meaty texture which I was put off a little by. The seasoning was great, and the beans were lovely, though, as I’ve said in previous recipes, I’m not the hugest tomato fan so maybe less tomatoes would have been better for me.

LRG_DSC01727

Still, it was a tasty enough recipe, that I might consider making it again, but I might try a different type of veggie sausage. These sausages contained a little milk protein in them too, so weren’t dairy-free which surprised me. But that’s a different issue!

I give this recipe 6/10

Food Challenge Recipe 32: Rice-Stuffed Tomatoes

I’ve made a few recipes from Smitten Kitchen during this challenge, and the last one I made Baked Tomato Sauce for Pasta was SO GOOD I knew I wanted to try another of her recipes soon.

I saw this recipe online, and actually made it on the same night as another of my favourite bloggers made her version of the same recipe – great minds and all that.

I like tomatoes, but not as much as my husband. Unfortunately, I was spoiled by an over-use of acidic tinned tomatoes in the 90s, and that somewhere ruined my like for the fruit. And I’ll also point out that the tomatoes we can get where I live tend to be watery and tasteless for most of the year. If I can find a recipe that brings out the natural sweetness of them, without having to add too much sugar, then I’m all in.

I will now add a disclaimer, that though I used to ALWAYS read a recipe over before starting, on this occasion I did my becoming-more-usual thing of skim-reading and missing the important parts…. nice work, Erin. So there were a couple of mistakes, but I think I managed to improvise adequately!

So, first off, I took 4 large vine tomatoes, and cut the tops off. I then scooped out the flesh, making sure not to pierce the bottoms or break the sides.

LRG_DSC01692

LRG_DSC01693

I salted the cavities, and turned them upside down on a plate to drain.

My first mistake was to throw out the tomato tops, because I was meant to keep them to pop onto the tomatoes later. But I didn’t – doh!

The flesh went into my blend-active bottle, to be lightly blitzed into a pulpy liquid.

My second mistake was to miss the part of the recipe where I needed a frying pan with a lid. I don’t own one of these, but I could have used a saucepan, and I didn’t. So, you’ll need a frying pan with a lid for the next part…..

I added some olive oil to the pan, and once heated added 1 tbsp of chopped onion, 1/2 crushed garlic clove and some chilli flakes and cooked them for a couple of minutes.

LRG_DSC01696

Then I added 6 tbsp of arborio rice and cooked it together for about 3 minutes until the rice had started to toast.

LRG_DSC01698

Then I added the blitzed tomato pulp, brought it to a simmer and reduced the heat to medium-low. I seasoned this with a little salt and a tsp of dried Italian seasoning.

LRG_DSC01701

I mixed this together, and then covered with an improvised lid – some kitchen roll. This wasn’t greatly effective and it absorbed come of the steam, so later on in the cooking process I needed to add a little boiled water, to help the rice along. This simmered for 10-15 minutes (until the rice was par cooked). I tasted this towards the end, and added some sugar, pepper and salt, to taste.

LRG_DSC01702

During this cooking time, I prepared some red potatoes by chopping them into cubes and coating with seasoning and a little oil.

LRG_DSC01703

The rice was ready, so I popped the mixture into the tomato shells, which were filled 7/8 of the way. At this stage you can either pop the tops back on, or some breadcrumbs. I had neither (doh!) so I just went with them the way they were.

They stood up in a prepared (oiled) baking dish, in amongst the potatoes which helped to keep the tomatoes upright.

LRG_DSC01705

These baked in the oven at 180C (fan) for 30 minutes. I jostled the potatoes about a little on a couple of occasions to stop them from sticking too much.

And once they were done, they looked like this:

LRG_DSC01708

The rice had started to brown and crisp up on top, and the tomatoes were soft and beginning to burst a little at the tops.

LRG_DSC01708

LRG_DSC01709

So, what was the verdict?

LRG_DSC01711

The rice was cooked just right, and the top part of the rice was slightly crunchy which I really enjoyed. The seasoning was spot on and the tomato shells were perfectly cooked.

LRG_DSC01712

The potatoes were a great accompaniment. I’m a ketchup fan, so a little ketchup to dip both elements into, brought the whole dish together.

This was a fairly simple and very tasty dish. I’d like to try this again, and perfect those two elements I messed up, so I can see what difference it makes.

I give this recipe 7.5/10


Food Challenge Recipe 30: Baked Breadcrumb & Herb Chicken Fillets

I’m going to start this recipe with a preface of the fact that I HATED this recipe. So if you’re looking for a tasty chicken goujon recipe, this isn’t it. If you just want to read about how much I hated eating this (or the little of it I actually ate) then please read on…

Gary and I eat chicken goujons a lot. They go with so many meals, and you can put so many sauces on them. And if you know us, you know we basically live for sauce, and finding food to go with it is secondary to the actual condiment.

I found this recipe on a website for a company who do meat subscription boxes. But it’s not a great recipe, and I hadn’t realised that part of the method was missing from it until after I had started.

Anyway, I put the oven to 160c and prepared a tray for the chicken to go on.

In a bowl I mixed 1 tsp paprika, 200g panko breadcrumbs (I actually used a little less than this because I had the end of an open packet – but this was way more than I needed), 1 tsp garlic powder, 1 tsp dried oregano, salt and pepper.

LRG_DSC01654

Then I mixed 1 beaten egg, 20ml of soy milk and 1 tbsp of olive oil. This was the part of the method that was missing. I wasn’t sure where the oil came into the recipe, so I just added it into the egg mixture and hoped for the best….

The chicken was dredged in the wet bowl, and then covered entirely in dry mix before being popped onto the tray.

LRG_DSC01666

I used some skin-off chicken breast fillets (enough for two people).

LRG_DSC01672

These went into the oven for 30 minutes.

LRG_DSC01675

And this was the finished article.

LRG_DSC01679

As you can see, the whole thing looks pretty dry. The breadcrumbs hadn’t absorbed any of the chicken juices and it was all just meh.

LRG_DSC01680

It wasn’t all the recipe’s fault. The quality of the chicken I picked up from Tesco was also pretty nasty. We both ate a little and then decided we didn’t want to eat any more, so just ate the veg I’d served it with.

There was little to no flavour from the seasoning in the breadcrumbs, and there were way too many breadcrumbs to be practical. The overriding flavour was the oregano, which isn’t where I thought the flavour would lie.

LRG_DSC01678

Overall, I give this recipe 1/10.

Food Challenge Recipe 29: Baked Tomato Sauce

This week’s recipe was adapted from one I saw from Smitten Kitchen, after seeing her post about it on instagram. I have one of her books, but this recipe wasn’t in there, so I got it off the website.

LRG_DSC01638

When I saw the ingredients and method, it looked so simple, but I was afraid that the mild watery cherry tomatoes available to me would affect the flavour of the finished sauce. Thankfully, this recipe, and the accompanying ingredients, worked together wonderfully to create a fantastically fresh and beautifully tomatoey sauce, in all the ways you’d want it to be tomatoey!

Here’s what I did for sauce enough for 2 people:

LRG_DSC01636

I took a small punnet of cherry tomatoes (about 250g) and sliced each one across its equator. Then I lay each one out, cut side up, in a baking dish, which had had 1 tbsp of olive oil coated over the bottom. You need to create a single layer of tomatoes.

Next I combined 1/6 cup of panko breadcrumbs, 1/8 cup of vegan parmesan, 1 tbsp of lacto-free mature cheddar cheese that had been grated and 1 crushed garlic clove. I mixed them with a fork to combine.

LRG_DSC01639

Then the whole lot was spread over top of the tomatoes.

LRG_DSC01640

You’ve got to make sure each tomato has a good amount of coating. Then I added a little salt and pepper, and drizzled with 1/2 tbsp of olive oil.

LRG_DSC01642

This was then popped into the oven at 180c (fan) for 20 minutes, until the crumbs are starting to brown and the cheese is all melted.

At this time I put some pasta on to cook, so that it was ready at the same time as the tomatoes.

At the end of their cooking time, I took the baked tomatoes out of the oven and added 1/8 cup fresh chopped basil and lightly mashed the tomatoes with a fork.

LRG_DSC01643

This created the sauce! The recipe then asked for another tbsp of oil to be added, but I didn’t want to add any more oil for dietary reasons. I don’t feel like it needed it.

I then mixed in the pasta, and Bob’s your uncle!

LRG_DSC01646

The finished sauce was fresh, tasty and well seasoned. The tomato flavour wasn’t lost. The breadcrumbs had mushed up, so weren’t crunchy at all, however they had mixed with the cheese to create a savoury, thick, seasoning. The basil was a fantastic addition. It added a fragrant green freshness.

LRG_DSC01647

We chose this pasta shape because I know it holds onto sauce very well. If you make this, I’d recommend that you use a small pasta shape that will hold onto the sauce, too.

I can see me making this pasta sauce regularly. It was simply, quick and so tasty!

I give this recipe 10/10


Food Challenge Recipe 28: Sweet & Spicy Baked Cauliflower

I’m trying to get better at tolerating spicy foods. It’s not that I don’t like it, or I’m not willing to try it, it’s just that too much spice in food results in me being unable to taste ANYTHING any more. That’s not the point of food!

But I don’t avoid heat, and at times will deliberately try foods slightly outside my comfort zone in a hope that it’ll ease my tolerance up. I’d wanted to try a baked cauliflower recipe for a while, and so when I saw this one, I thought “why not??”!

You start with 4 cups of cauliflower florets. For me this was a whole small cauliflower head.

LRG_DSC01606

For the next part I grabbed a quart sized Ziplock bag to put the liquid for the marinade into, which made for a quick mix and simple cleanup.

LRG_DSC01607

I added 2 tablespoons of maple syrup, 2 tablespoons of olive oil, 1 tablespoon of Sriracha (the recipe asked for 2 but I was too scared to add that much hot sauce!), 1/2 tablespoon of light soy sauce and 1/2 teaspoon of black pepper.

To this I added all the cauliflower, sealed the bag and smooshed and shook the whole lot until it was covered as evenly as I could get it!

LRG_DSC01608

I’d already lined a baking sheet, and had the oven on at 180c (fan). This might have been a little hot, so next time I’ll bake this at 170c.

LRG_DSC01609

I was able to simply pour the whole lot onto the sheet, spread it out evenly so that everything had the chance to bake and crisp up (if the tray is too crowded the veg will steam instead of crisping) and pop it in the oven for 30 minutes.

LRG_DSC01610

I took my baking sheet out a couple of minutes early, when I noticed some of the edges were starting to char. I also think that my tray might have been slightly over crowded in areas as the florets were a little too moist in parts. I gave one of the florets a try whilst it was still warm.

LRG_DSC01611

I was glad I hadn’t added too much Sriracha as the bit I tried was really rather spicy! But my intention for this recipe was to allow the cauliflower to cool, and then top a salad with it. So that’s what I did!

LRG_DSC01612

Once it was cool, I found the spiciness had reduced a LOT. In fact, if I make this again, I might add more hot sauce if I intend on eating this cold again. The flavour was really lovely. Spicy but also sweet (like the title suggested!) and the cauliflower flavour still came through nicely.

LRG_DSC01614

I really enjoyed eating this. We had quite a bit left over, and I must admit it did leave the fridge smelling rather pungently of cauliflower, but the flavours were really good even days afterwards.

I give this recipe 7/10

Food Challenge Recipe 27: Home-Made Frappe!

If you haven’t noticed, it’s been rather hot of late. I’m not complaining – I bloody love the heat and can’t get enough of it. I want to feel the warmth of the sun on my skin ALL THE TIME. But sometimes it’s nice to have something icy and cold to eat or drink.

This week I decided I wanted to have a crack at making a blended coffee (or frappe) at home because I blooming love them, and figured it would be something nice to start my day off. On the day I made this, by the time I’d gotten up it was already 24c outside, so it seemed only appropriate!

LRG_DSC01615

If you want to give this a go yourself, you’re going to have to work out the measurements for yourself based on how much coffee and sweetness you want, and also how big your cup is. I was making one blended coffee, I didn’t need it very sweet and I didn’t want a huge amount of caffeine. I was making mine for an average sized cold drink reusable travel cup, with straw.

I made my blended coffee in a BlendActive machine and it was more than capable of blending the ice. I filled the blending bottle 3/4 full with ice cubes.

LRG_DSC01619

I then used light soy milk to fill the cup to almost the height of the ice.

LRG_DSC01617

Next I made some hot coffee with 1.5 tsp of freeze-dried instant coffee, in an espresso cup.

LRG_DSC01618

I added 2 tsp of Monin caramel coffee syrup to this hot coffee and mixed it in. This probably wasn’t enough syrup so add more if you like it sweet.

I tipped the hot coffee and syrup mixture into the blending bottle, on top of the ice and milk. Then I blended it!

It took less than 20 seconds to be blended and ready!

LRG_DSC01623

And here’s the finished article! The ice was slightly more chunky than those you’d get if you bought it in a coffee shop, but crushed enough to go through the straw with no issues.

LRG_DSC01621

This was a very refreshing alternative to my usual hot morning coffee, tasted great and stayed icy for a really long time in this cup, so I was able to take it out and about in the hot morning sun as I ran my errands.

Next time I think I’ll add a little more syrup, but for this occasion it was perfect!

I give this recipe 9/10!

Food Challenge Recipe 26: Easy Baked Churros

And just like that, we’re over half way through the challenge! I must say, so far, I’ve not had a huge amount of trouble finding a new recipe each week. I think because foods are seasonal (obviously) and I’m picking things that I know I’d love to eat, it’s made this an enjoyable challenge!

This week we picked another theme park food. It will probably be our last since I can’t think of any more that we love and we haven’t tried yet! We decided to make Churros – but bake them in the oven!

I’m not a fan of fried foods and the idea of deep-frying anything at home gives me hot sweats, so I found a decent looking recipe on Pinterest and away we went.

You start off with a preheated oven 160c (fan) and a couple of lined baking sheets.

Then you add 1/2 cup of unsalted butter (I used Vitalite), 1/2 tsp salt, 2 tbsp granulated sugar and 1 cup of water to a medium saucepan.

LRG_DSC01582

You pop this on the hob on a medium heat until the butter has melted and the water has started to boil.

LRG_DSC01587

LRG_DSC01589

Then you add 1 cup of white flour all in one go, still on the heat, and beat it fast to make a dough. Once the dough has formed you keep beating for another 30 seconds, so the flour all cooks out.

You then remove this from the heat and add 3 large eggs, one at a time. You have to work fast mixing each egg into the dough, to ensure the eggs don’t scramble!

LRG_DSC01590

It was at this stage I realised I was making choux pastry. Yes, I know I’m slow on the uptake, but I didn’t realise that was what churros were made of!

I then added 1 tsp of vanilla extract and mixed this through, then added the mixture to a piping bag with the largest star tip I owned. Which wasn’t big enough so I had to pipe two strips on top of each other for each churro but it worked!

LRG_DSC01592

I began piping and left 1 inch between each churro. Then I piped on top again with what was left. I had way too much mixture for two trays but I made it work!

These then went into the oven for 22 minutes.

LRG_DSC01599

You know they’re done when they’re golden and crispy. I left these on the cooling rack to completely cool.

Then I melted 1 tbsp of Vitalite in a pan. I added 1/4 cup granulated sugar and 1/2 tsp of ground cinnamon to a ziplock and shook the mixture together. Then, in batches of two, I brushed the churros with the melted butter and popped them into the bag, shook them around and made sure they were all coated with sugar.

LRG_DSC01600

The result was this lovely looking pile of goodies!

LRG_DSC01602

The verdict:

The churros were baked so were a lot lighter than the fried equivalent I’m used to. They were light and airy in the middle, and I kept thinking they needed something inside them like cream or chocolate.

LRG_DSC01604

They were very Eclair like, which makes sense since it’s the same pastry, however they had a very eggy flavour to them which I didn’t expect.

LRG_DSC01605

On trying them straight away they were lovely. I packed some in a tin to take to a friend’s house and they were eaten again about 2 hours later. By this point they’d lost their crispness and were starting to go a little soggy, which was a shame. They were still all eaten though!

I think these were a nice little treat. They take a little effort, and would need to be eaten right away. They would be lovely dipped in caramel or chocolate sauce, and were a nice light equivalent to the fried version.

I give this recipe 7.5/10